Installation
pip install flask
Hello World
from flask import Flask
app = Flask(__name__)

@app.route('/')
def hello_world():
    return 'Hello, World!'

if __name__ =="__main__":
    app.run(debug=True, port=8080)
name 是Python中的特殊变量,如果文件作为主程序执行,那么
__name__变量的值就是__main__,如果是被其他模块引入,那么__name__的值就是模块名称, 这里的值就是app默认情况下其地址是
localhost:5000,在上面的代码中,我们使用关键字参数port将监听端口修改为8080
自动刷新
将debug=True 开启即可
导入配置文件方法
config.py
DEBUG=True
from flask import Flask

# from config import DEBUG #该方法可以省略了


app = Flask(__name__)
app.config.from_object('config')


@app.route('/hello')
def hello():
    return 'hello world'


app.run(debug=app.config['DEBUG'])  # 通过字典方式读取
开启多线程
app.run(threaded=True)
工作原理

当一个请求进来,先检查_app_ctx_stack 的堆栈中是否为空,若没有,那么将实例化 的AppContext 推入到栈中,然后 实例化一个Request Context,封装的信息在Request中,然后将Request Context推入到LocalStack中,LocalStack实例化之后,存储到_request_ctx_stack 中
在使用current_app(Local Proxy) 和 request(Local Proxy) 其实就是间接的操作两个栈顶的元素,也就是这两个上下文
AppContext 将Flask作为核心对象保存起来,RequestContext 把Request对象封装并保存了起来
current_app指向的是LocalStack.top 栈顶元素的一个属性也就是 AppContext top.app = Flask 的核心对象
request是指向LocalStack.top 栈顶元素下面的Request请求对象,即 RequestContext top.resquest = Request
LocalStack原理
Local是用字典的方式实现线程隔离,访问Local通常使用.点来访问下面的属性
LocalStack封装了Local对象,把Local对象作为一个属性,从而实现了线程隔离的栈结构,访问LocalStack需要使用指定的方法push,pop,top
from werkzeug.local import LocalStack

s = LocalStack()
s.push(1)
print(s.top)
print(s.top)
print(s.pop())
print(s.top)

s.push(1)
s.push(2)
print(s.top)
print(s.top)
print(s.pop())
print(s.top)

>>>
1
1
1
None
2
2
2
1
线程隔离
使用线程隔离的意义在于,使当前线程能够正确引用到他自己所创建的对象,而不是引用到其他线程所创建的对象
使用线程ID作为字典的Key来实现线程隔离
import threading, time
from werkzeug.local import LocalStack

my_stack = LocalStack()
my_stack.push(1)
print('Main thread with push value:', str(my_stack.top))


def worker():
    "New thread"
    print('New thread before push with value:', str(my_stack.top))
    my_stack.push(2)
    print('New thread after push with value:', str(my_stack.top))


new_t = threading.Thread(target=worker, name='rick_thread')
new_t.start()
time.sleep(1)
print('Eventually, main thread value:', str(my_stack.top))

>>>
Main thread with push value: 1
New thread before push with value: None
New thread after push with value: 2
Eventually, main thread value: 1
Flask 源码结构
├── __init__.py
├── __main__.py
├── _compat.py
├── app.py
├── blueprints.py
├── cli.py
├── config.py
├── ctx.py
├── debughelpers.py
├── globals.py
├── helpers.py
├── json
│   ├── __init__.py
│   └── tag.py
├── logging.py
├── sessions.py
├── signals.py
├── templating.py
├── testing.py
├── views.py
└── wrappers.py
app.py
含有核心实例化的Flask类
Flask
保存配置文件信息, 注册路由,以及试图函数的功能
Context 上下文 ctx.py
上下文可以理解为环境,为了程序的正常运行,一些操作的相关状态和数据需要被临时保存下来,这些状态和数据被统称为上下文
而“切换”指的就是保存某个线程当前的运行状态,之后再从之前的状态中恢复
flask中有两种,分别为应用上下文和请求上下文
AppContext 应用上下文
对Flask 核心对象的封装
self.app = app 即封装了Flask实例化的核心对象
定义了4个方法,push, pop, __enter__ , __exit__
设计思想,即有些对象的属性是在对象外部的,不属于对象本身的,所以可以设计上下文对象将对象外部的属性和操作关联起来,放到新的上下文对象中
在下面的情况下会自动激活应用上下文
在使用flask run 命令启动程序
使用旧的app.run() 方法
执行@app.cli.command() 装饰器注册flask命令
使用flask shell命令启动Python Shell
current_app 上下文全局变量
处理请求的当前程序实例
其指向就是Flask的核心对象, 即LocalStack中top的AppContext 属性
g 上下文全局变量
替代Python的全局变量用法,确保仅在当前请求中可以用,用于存储全局数据,每次请求都会重设
g在应用上下文随着每一个请求进入而激活,锁着每一个请求的处理完毕而销毁,每次请求都会重设这个值
RequestContext 请求上下文
即封装请求对象Request (这里是大写的Request)
同样和AppContext一样,定义了4个方法,push, pop, __enter__ , __exit__
Flask在每个请求产生后自动激活当前请求的上下文,激活请求上下文后,request被临时设为全局访问,每个请求结束后,Flask就销毁对应的请求上下文
多个请求发出,每个请求对象在各自的线程内是全局的。Flask通过本地 thread local 将请求对象在特定的线程和请求中全局访问。
请求上下文激活后,就可以使用request和session变量,同时应用上下文也会被自动激活。请求处理完毕后,请求下上文和应用上下文也会自动被销毁。
request 上下文全局变量
封装客户端发出的请求报文数据
其指向就是Request的对象, 即LocalStack中top的RequestContext 属性
session 上下文全局变量
用于记录请求之间的数据,通过签名的Cookie实现
werkzeug Local 线程隔离
通过werkzeug 中的Local对象,实现线程隔离的数据操作
线程隔离的作用是: 使当前对象可以正确的使用自己创建的对象, 而不会使用和破坏其他线程的对象.
LocalStack作为栈结构的特性, 是一个线程隔离的对象
Werkzeug 通过自定义 werkzeug.local.Local 类实现线程隔离的栈结构, 封装了push, pop, 和top方法.可以将对象推入、弹出,也可以快速拿到栈顶对象. 同样具有线程隔离的作用. 并没有直接使用threading.Local .
栈是一种先进后出的基本数据结构.
from werkzeug.local import LocalStack
s = LocalStack()
s.push(1)
print(s.top)
print(s.top)  # 获取栈顶元素
print(s.pop())  # 弹出栈顶元素
print(s.top)  # 弹出的栈顶元素会删除

s.push(1)
s.push(2)
print(s.top)
print(s.top)
print(s.pop())
print(s.pop())
线程隔离的特性
my_stack = LocalStack()
my_stack.push(2)
print('in main thread after push , value is ', my_stack.top)

def my_work():
    print('in new thread before, value is ', my_stack.top)
    my_stack.push(3)
    print('after new thread after push, value is ', my_stack.top)
new_thread = threading.Thread(target=my_work, name='my_work_thread')
new_thread.start()
time.sleep(1)
print('finally, in new thread , value is', my_stack.top)

>>>
in main thread after push , value is  2
in new thread before, value is  None
after new thread after push, value is  3
finally, in new thread , value is 2
源代码
class Local(object):
    __slots__ = ('__storage__', '__ident_func__')

    def __init__(self):
        object.__setattr__(self, '__storage__', {})
        object.__setattr__(self, '__ident_func__', get_ident)
    ...
     def __setattr__(self, name, value):
        ident = self.__ident_func__()
        storage = self.__storage__
        try:
            storage[ident][name] = value
        except KeyError:
            storage[ident] = {name: value}
__slots__限制了Local类只可以有两个属性:__storage__和__ident_func__。从构造函数,
__storage__是一个字典,而__ident_func__是一个函数,用来识别当前线程或协程.ident 变量取到的是线程的ID号作为key,实现线程隔离
Flask工作原理
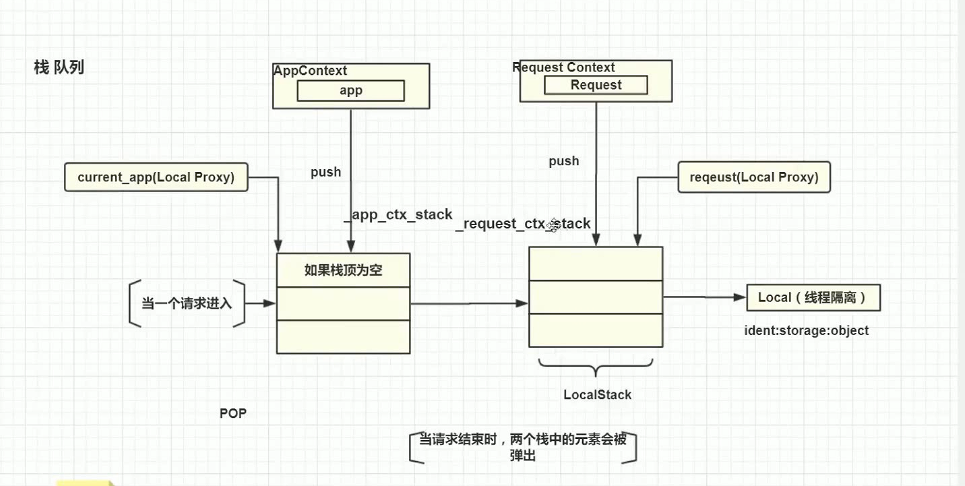
一个请求进入flask框架后, flask会首先实例化一个Request Context封装了这次请求的相关信息(Request), 然后将请求上下文推入栈_request_ctx_stack(这是LocalStack的一个实例).
在RequestContext对象入栈之前会检查App Context对应栈栈顶的元素, 如果不是当前的app, 则会先将app推入. 因此如果在一个请求中使用(注意是在请求中)使用current_app是不需要手动push的.
current_app(Local Proxy)取得是_app_ctx_stack 的栈顶元素中的app属性, 这个属性就是我们自己创建的app=Flask(__name__, 如果栈顶为空,则提示unbound,
同样的request(Local Proxy)指的是_request_ctx_stack的栈顶对应对象, 当一个请求结束的时候会出栈.
环境变量
如果安装了python-dotenv,使用flask run 或者其他命令时会自动从.flaskenv 文件和.env文件中加载环境变量
pipenv install python-dotenv
.flaskenv
存储和Flask相关的公开环境变量
.env
存储包含敏感信息的环境变量
static
static文件分应用程序static和blueprint static
Flask 核心的对象调用,默认为app目录下面的static,可以手动指定目录, 如果是共享static文件,就放到app应用程序下面
app = Flask(__name__, static_folder='view_models/statics', static_url_path='')
Blueprint 方法
web = Blueprint('web', __name__, static_folder='', static_url_path='')
template
默认和程序实例模块处于同一个目录下面
在初始化Flask核心对象或者blueprint的时候, 传入参数
template_folder='templates'
目录结构
├── app
│   ├── __init__.py
│   ├── admin
│   │   ├── __init__.py
│   │   ├── forms.py
│   │   └── views.py
│   ├── home
│   │   ├── __init__.py
│   │   ├── forms.py
│   │   └── views.py
│   ├── modules.py
│   ├── static
│   │   └── __init__.py
│   └── templates
│       ├── admin
│       └── home
├── demo.py
└── manage.py
蓝图
一种应用中或者跨应用制作应用组件和支持通用的模式
可以将不同的功能模块化,增强可读性,易于维护
不建议将其作为试图函数的拆分
蓝图不能独立存在,需要插入到app的核心对象里面

前端布局
静态文件引入
{{ url_for('static', filename='FILE_PATH') }}
定义路由
{{ url_for('MODULE_NAME.VIEW_NAME', VARIABLE=PARAMETER) }}
定义数据块
{% block BLOCK_NAME %}
INFO
{% endblock %}
插件
wtforms
对传入的http参数进行验证
验证层
对参数校验, 一般防止在app下面,叫forms
WSGI
Web Server Gateway Interface
Flask 通过Werkzeug实现请求解析(request)和响应封装(response), 通过WSGI将HTTP的请求数据转换成Flask程序能够接受的python数据, flask 根据URL对应的视图函数获取返回值生成响应,再经过WSGI转换生成HTTP响应返回给客户端
服务器端推送
SSE
Server-Sent Event
通过HTML5种的EventSource API实现,SSE会在客户端和服务器端建立一个单向的通道,客户端监听服务器端的数据,而服务器端可以在任意时间发送数据,二者建立类似订阅发布的通信模式
传统轮询 AJAX
客户端使用AJAX技术不断向服务器发送HTTP请求,然后获取新的数据并更新页面
长轮询
类似于传统轮询,服务器端若没有返回数据,就一直保持连接开启,直到有数据返回,取回数据
Websocket
基于TCP协议的全双工通信协议,对比上述3种,实时性更强
安全防护
SQL 注入
通过ORM(Object Relational Mapper) 可以一定程度避免SQL注入的问题
安全检查清单,参考OWASP Top 10 或是CWE Top 25 https://cwe.mitre.org/top25 , 漏洞检测工具https://github.com/OWASP/OWASP-WebScarab
XSS
Cross-site Scripting
反射型
通过URL注入攻击脚本,用户访问URL时会执行攻击脚本
@app.route('/hello')
def hello():
    name = request.args.get('name')
    response = '<h1>Hello, %s!</h1>' % name
http://example.com/hello?name=<script>alert('Bingo!'); </script>

客户端接收的响应会变成为
<h1>Hello, <script>alert('Bingo! '); </script>! </h1>
如果站点A存在XSS漏洞,攻击者将包含攻击的代码链接发送给网站A用户Rick,当Rick访问这个链接就会被执行攻击代码
存储型
任何用户访问包含攻击代码的页面都会被殃及。如果用户的表单数据不经过任何处理存到数据库,很容易插入Javascript代码
<script>window.location.href="http://attacker.com";</script>
通过对用户输入的内容进行转义,可以防范。即把变量的标记内容转换为文本而不是HTML代码, 如Jinja2 的escape()函数
from jinja2 import escape


@app.route('/hello')
def hell():
    name = request.args.get('name')
    response = '<h1>Hello, %s! </h1>' % escape(name)
CSRF
Cross Site Request Forgery 跨站请求伪造
若用户登陆A站点,认证信息保存在cookie中。用户访问攻击者创建的B网站时,攻击者通过在B网站发送一个伪造的请求提交到A服务器上,让A服务器误认为请求来自于自己的网站, 对用户信息造成篡改。
解决方法就是正确使用HTTP方法,GET方法属于安全方法,不会改变资源状态, POST方法用于创建修改删除资源。
一般通过在客户端页面加入伪随机数来防御CSRF攻击,这个数称为CSRF token
POST方法请求通过表单创建,把服务器创建的伪随机数天假到表单中的隐藏字段的里和session变量中,当用户提交表单是,令牌会和表单数据一起提交,在服务器端处理POST请求时,对表单中的令牌进行验证来确认session的令牌
对于AJAX请求,可以在XMLHttp Request请求首部天假一个自定义字段X-CSRFtoken保存CSRF令牌
Debug Toolbar
pipenv install flask-debugtoolbar
from flask import Flask
from flask_debugtoolbar import DebugToolbarExtension
app = Flask(__name__)
toolbar = DebugToolbarExtension(app)
工厂函数
def create_app(config_name=None):
    if config_name is None:
            config_name = os.getenv('FLASK_CONFIG', 'development')
    app = Flask('bluelog')
    app.config.from_object(config[config_name])
    register_logging(app)
    register_extenstions(app)
    register_blueprints(app)
    register_commands(app)
    register_errors(app)
    register_shell_context(app)
    register_template_context(app)
    return app

def register_logging(app):
    pass

def register_extensions(app):
    bootstrap.init_app(app)
    db.init_app(app)
    ckeditor.init_app(app)
    mail.init_app(app)
    moment.init_app(app)

def register_blueprints(app):
    app.register_blueprint(blog)
    app.register_blueprint(admin, url_prefix='/admin')
    app.register_blueprint(admin, url_prefix='/auth')

def register_shell_context(app):
    @app.shell_context_processor
    def make_shell_context():
        return dict(db=db)

def register_template_context(app):
    pass

def register_errors(app):
    @app.errorhandler(400)
    def bad_request(e):
        return render_template('error/400.html'), 400

def register_commands(app):
    pass